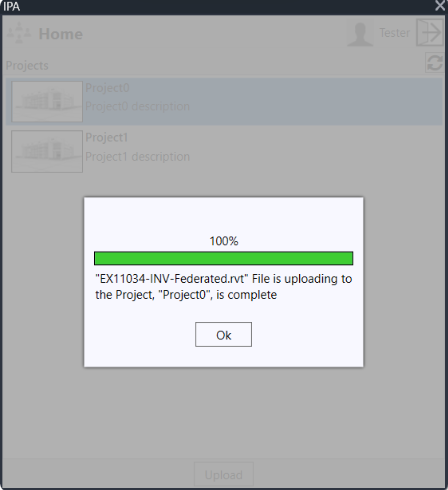
Exporting a Revit model
Overview
Since Platform version 5.2, you now have more options for exporting Revit models, namely:
- Export 2D and 3D detailed models (as in previous versions)
- Export an outline model (introduced in Platform version 5.1)
- Incremental export (introduced in Platform version 5.2)
Incremental export
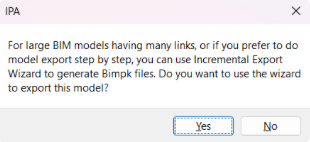
Platform version 5.2 introduced the incremental export feature which allows you to export a large-scale Revit model to a BIMPK file in several parts. A wizard is provided to assist with each step of the incremental export. When you start a model export, you will be asked if you want to use incremental export. If you answer yes, then the export wizard will start up and assist you with the incremental export procedure.
For more information, refer to the section How to perform an incremental export.
Export Options dialog box
For detailed information on the range of options available in the Export Options dialog box, refer to the Export options dialog box page.
How to export a 2D or 3D Revit model
To export a 2D or 3D detailed model, do the following:
-
In the Revit app, to set your project to 3D view, on the View tab, in the ribbon, click the 3D View icon.
Note: This method activates the default 3D view. You can select another 3D view for export with the Revit project browser.
-
From the plug-in main page, click the project you want to export, then click Upload.
Note: If it is a new project and it doesn't appear, click the Refresh button.
Note: If the level of detail is not set to fine, a pop-up appears for you to confirm this choice. For more information on the appropriate, level of detail for your project, see View level of detail. If you want to change the level of detail to Fine, on the toolbar, at the bottom of the 3D-view page, from the checkered Level of Detail icon, select Fine.
-
In the Export Options dialog box, select your export options, then click OK. For more information, see Export options dialog box.
-
In the Select 2D Views dialog box, select the 2D views you want in your model, such as floor plans, sections, and elevation views, then click OK. The upload starts.
Note: The 2D views feature is only available for Revit2020 and later.
Note: If there is an error in your upload, you can find more information on the error in the log file in the following location: . For additional assistance, send the log file to your support team.
-
To load the model in your digital twin application, complete the following steps:
a. Open your digital twin application.
b. On the sidebar, click the Manage Models icon.
c. From the Select Model drop-down, select your model.
d. From Select Model Version, select the checkbox of the version you want.
Note: When the upload is complete, you can also find the BIMPK file in your Temp folder.
How to export an outline model
Outline building models are a feature of the new Federated Model View, which was introduced to the IafViewer in Platform version 5.1. The outline model is the outer shell of a building and will be used by the GIS view of the Platform viewer.
Figure: Export Options dialog
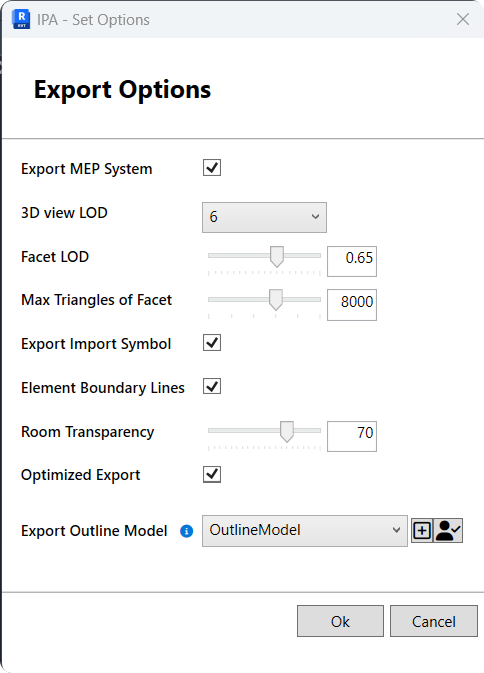
To export an outline model. do the following:
-
To prepare for export an outline model, you first need to prepare one 3D view. In Outline-Model view, only show necessary elements. It can be done via setting visible linked files for this view, and selecting the Revit categories to be visible, such as walls, floors, windows, doors, roofs, curtain panels,and mullions.
-
Create Scope boxes and use them to scope the shell elements of the BIM model.
-
In the Export Options dialog, look for the option at the bottom of the dialog, Export Outline Model. In the drop-down list, look for the 3D view for outline model export.
-
If the option OutlineModel is not listed then note the Create OutlineModel view button to the right of Export Outline Model (marked with a plus symbol). Click this button to create an outline model view based on the selected 3D view for model export.
Figure: Export Outline Model buttons

-
Now in the Export Outline Model drop-down list, you will see a new option OutlineModel. Select this option for outline model export.
-
Click OK to continue model upload.
-
Now select a 2D view if required. This step is optional.
-
The plug-in will now begin the model exoort. It will first generate a Bimpk file. The plug-in will then export the outline model to a
.glbfile, and then add that.glbfile into the BIMPK file. The Outline Model will then be uploaded to the platform via BIMPK.
Previewing Outline Model before export
To the right of the Create OutlineModel view button, is the Preview Outline Model export button (indicated by a figure of a person). Click this to do a quick export which will give you a preview of the Outline Model before uploading to the Platform. Adjust the view as nececssary until it is suitable for export.
Figure: Export Outline Model buttons
Notes on exporting outline models
Note the following:
-
Export outline model is an additional option to 2D and 3D model export, and is optional.
-
If you do not select 3D view for outline model export, the outline model will not be exported.
-
By default, the plug-in will search default Outline Model view for outline model export based on the selected 3D view for model upload. If the default view exists, the plug-in will automatically select it.
How to perform an incremental export
The new incremental export feature allows you to export a large-scale Revit model to a BIMPK file in several parts. When exporting each part of the model, the IPA plug-in may append exported data to the same BIMPK file, and at the end, the user can generate one BIMPK file for the entire model.
Advantages of incremental export
The main advantages of this feature are that it reduces memory usage and extends the ability of the Revit plug-in to export larger models. It also ensures that exports are more manageable and reliable. Before this feature was added, the IPA plug-in would always generate a new BIMPK file for each export. It was also impossible to export part of a model and append it to an existing BIMPK.
Using the incremental export wizard
For this new feature, the Revit IPA plug-in provides a wizard to assist you, step-by-step, when performing an incremental export.
Detailed steps
To perform an incremental export, do the following:
- When you start the model upload, you will be prompted and asked if you want to use incremental export. If you answer Yes, the plug-in will switch to the Incremental Export wizard. If you click No, the plug-in will continue the model export procedure in the regular way and display the Export Options window.
- When the Incremental Export wizard starts up, it will display the Select Bimpk dialog. It will ask you to select a BIMPK file from a previous export or to skip that step if it is a new export. Click Next to proceed.
Note: If you have partially exported the model before and already generated a BIMPK file, you may select that BIMPK file to continue with the incremental export. Two files are required for incremental export:
<model name>.bimpkand<model name>.bimpk.json. The JSON file holds required export data. Ensure that the two files are in same folder. You only need to select the.bimpkfile and the plug-in will automatically search for the.bimpk.jsonfile.
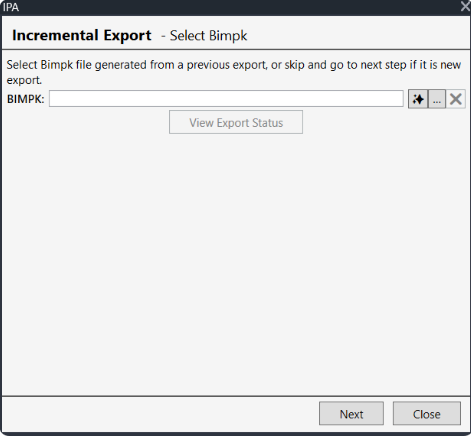
Note: When selecting a BIMPK file, you can avail of the auto select button (indicated by a star icon, to the right of the BIMPK field). This will auto select a matching BIMPK file. If you exported the model in the same Revit session before starting the Incremental Export wizard, click the auto select button. The plug-in will then search for the matching BIMPK file from the local temporary directory where the BIMPK file is stored. If it is found, the plug-in will automatically fill in the matched BIMPK file in the BIMPK field.
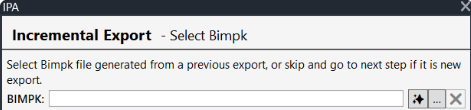
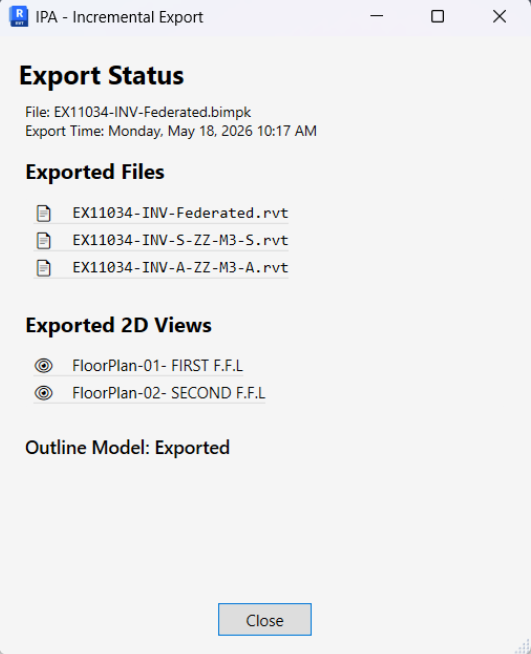
Once a BIMPK file is selected, the View Export Status button will be enabled. You can click this button to view the export status of the existing BIMPK file.
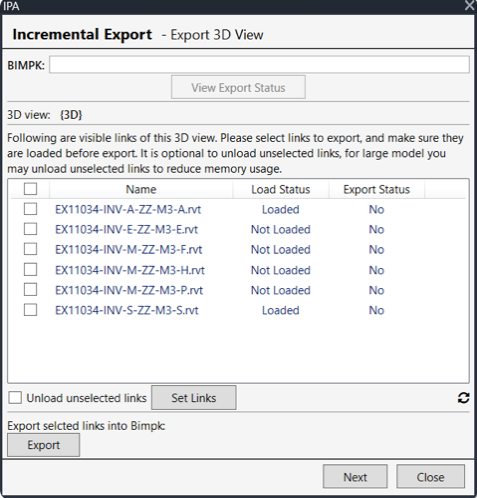
- On the Export 3D View dialog, you are presented with a list of visible links of the 3D view to select for export. After selecting links, click the Set Link button to ensure that all the selected links are loaded. Then click the Export button to export your selected links. You can select more links to export until all the required links are exported. Click Next to proceed to the next step.
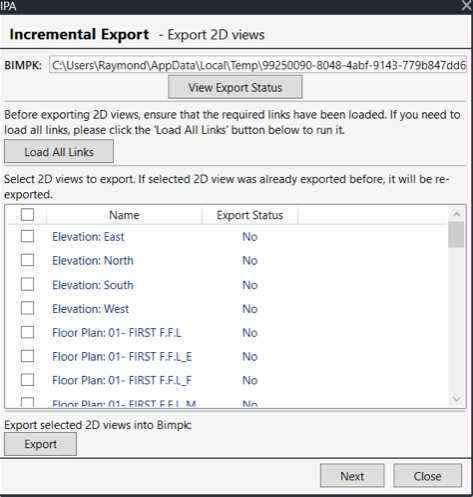
- On the Export 2D View dialog, you are presented with a list of 2D views which you can select for export. This step of exporting 2D views is optional. If there are no 2D views to export, you can skip this step and click Next to proceed.
- On the Export Outline Model dialog, you can select a 3D view and export an Outline-Model
.glbfile into the BIMPK file. This is done in a similar way to how you normally export an outline model. See How to export an outline model. Exporting an outline model is optional. If the outline model is not needed, you can skip this and click Upload Bimpk. If before uploading the BIMPK file, you need to make more seletions for the 2D views export, you can do this by clicking the Back button to go back to the previous step.
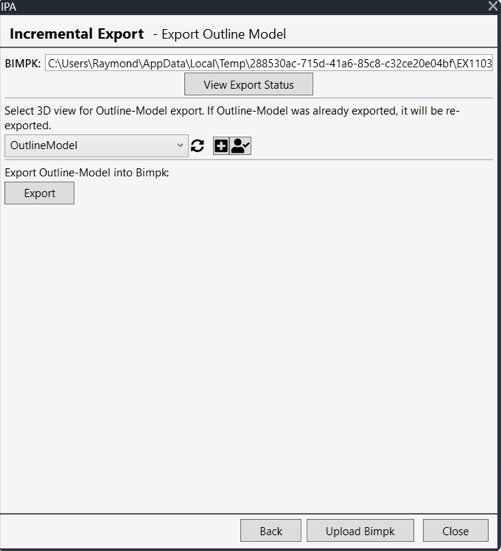
- After exporting the Outline model, the BIMPK file generation has completed. You can now upload the BIMPK file to the Platform application or close the wizard to return to the main page. When the upload begins, the plug-in will switch to the regular model upload page and display the progress of the upload. When the upload is done, you can close the model upload page and the plug-in will return to the main page.